Christen is a Great Lakes Gypsetter

slider-6

At Electric Frenchie, we love a girl that can mix up fringe and lace. Christen is a master of switching up her look on the daily for her fashion blog Two Happy Hearts. She took a few minutes to share some tips for fashion bloggers, spill who her favorite style icons are, and brought her #frenchiestyle to the Farmer’s Market.

image

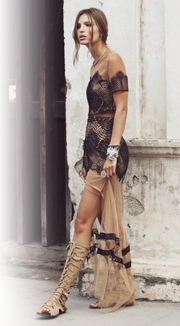
Christen is wearing UK brand Yumi teal scallop shorts from Electric Frenchie. 

EF: Where does the name “Two Happy Hearts” come from?

2HH: The blog is a collaboration of myself and my husband. He takes all of the photos. He is a perfectionist so that can be tough when it’s cold but he is my best friend so I am comfortable taking photos with him.

image

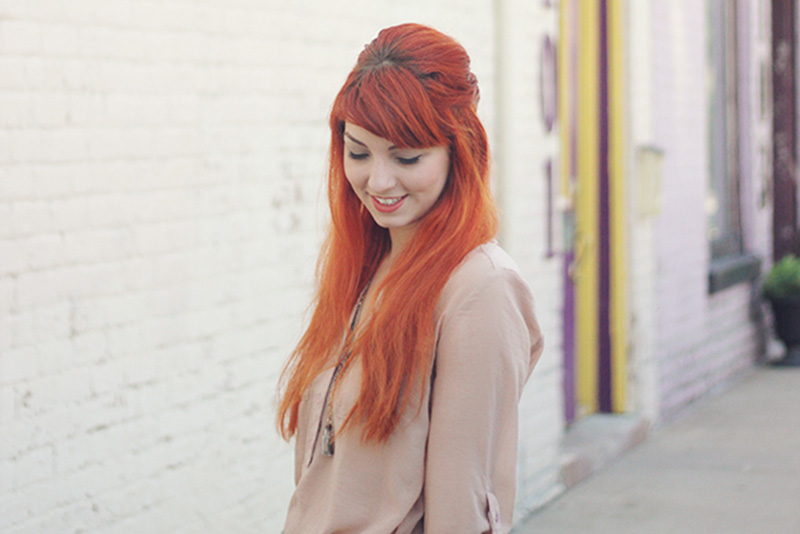
EF: You change your hair up on the regular. Loving this bright red right now! What is your favorite hair trend?

2HH: Well, I am liking the red right now. I use the same dye every time but the red changes from a deep red to coppery. I use “Red” by Wella.

EF: Who are your style icons of all time?

2HH: Marilyn Monroe, Edie Sedgwick, and Audrey Hepburn

image

EF: Do you have any advice for bloggers who want to get started?

2HH: Stay true to what you love. Try not to compare yourself to other bloggers. There is a quote I like “Comparison is the thief of joy”. Also, reaching out to other bloggers. It’s amazing how supportive the blogger community can be of each other.

EF: How do you enjoy one hour of “me” time?

2HH: Lately I have been trying to read more. I am reading Under Wild Wood by Colin Meloy right now it is soooo good! It’s part of an excellent series.

image

EF: If you could travel anywhere for your next trip, where would you vacation?

2HH: Europe. I have never been and would love to go with my husband to France, Italy and Turkey.

EF: What is on your Spotify playlist right now?

2HH: Teagan and Sara & Lana Del Rey

image

EF: We love how varied your style is. What inspired you to start designing clothes with your sister Kylie?

2HH: We created Midnight & Dawn together because we both love vintage and wanted to be able to create universally flattering clothes that are timeless. If I am inspired by a fabric I love, I will build from there. Sketch some ideas and start the pattern.

For anyone who hasn’t checked out Christen’s blog or design line, get to it! The clothing line has some amazing little people clothes that make us want a baby to dress up. Christen and her husband do a great job of expressing their creativity and sharing a piece of their daily life with the blogosphere. 

image

Get the Look…

orange-maxi-dress-serena-gossip-girl

Inspired by Gossip Girl. In Season 3 Serena wears a Marchesa gown to a wedding, looking like the perfect guest for a fancy fet’e. Recreate the look with a gold wrap bracelet and our new Keepsake Tidal Wave Maxi dress.

10 Garden DIY Mini-Projects

Inspired by Summer’s beautiful flowers and my friends’ lovely yards, I decided to gather up some backyard DIY ideas that are both affordable and innovative. If you try any of these yourself – we’d love to see photos! You can comment with a link to yours below!

Idea #1

image

Make a peacock with a garden pot holder and your favorite wine bottles. Or you can cheat and buy one for $75 here.

See 8 more ideas (like nighttime water bottle bowling..yes!) after the jump!

Idea #2

If you have steps going down to a pool, create a nice water fountain by purchasing a submersive pump and appropriate hose. Definitely for the advanced DIY’er, here is a helpful how-to that talks about the logistics of digging for a pump and water flow. Read here.

Idea #3

It’s super cute and only requires some paint, flowers, old tin barrels that can be found at a junkyard and small umbrellas found at the dollar store.

Idea #4

Create a fancy garden structure where there is no grass with retired tires, wooden pegs, a tin base (with holes in it for watering) and soil.

Idea #5

Creating a structure with wood (hello hunky carpenter friend!) and old milk cartons, you can create a starter herb garden. See what kind of herbs work for your environment, then commit to planting them in the ground.

Idea #6

This is really to show off the bottles on the wall so ignore the over-complicated DIY above. A plastic bottle has two holes on either side so that wire can be fed through. A large nut under the bottle keeps it in place on the wire. Then cut out a place for your plant and soil!

Idea #7

One of my favorite finds! Glow in the dark water bottle bowling. Get glow sticks (which everyone loves anyways, and should keep many in-stock at the house) and water bottles. Add a kickball.. DONE!

Idea #8

This looks like a magical fairyland and it all it took was some hanging lanterns, which can be found at a local goodwill or home decor super center, and ladders. Add tea lights when you want some extra ambiance. If you have mosquitos like we do in Texas, put citronella mini-candles in your ladders!

Idea #9

Another really fun idea for kiddos (or adults, who’s kidding). Find square rocks at your local Home Depot or Lowes and find some circle rocks to throw some paint on. Minutes of entertainment!

Fishtail Braid How-To

fishtail-braid-hi-0606-mdn

Love braids, but don’t know how to make them? Grab a comb, clip, and elastic and get started now!

1. Part your hair down the center. Beginning on the right side of your part at your forehead, twist a one-inch section of hair away from your face.

2. Use a comb to separate a 1/2-inch section right below the first section along your face and twist that piece away from your face, combining it with the first piece.

3. Continue adding 1/2-inch pieces along your hairline down to your neck. Use a clip or a bobby pin to hold the hair in place at the nape of your neck.

4. Repeat the twisting on the left side, starting at your forehead.

5. When you reach the nape of your neck, unclip the right side and hold both the left and right sides in two separate sections.

6. Pull a 1/2-inch section of hair from the right section and add it to the left section. Repeat with a piece from the left section, adding it to the right section.

7. Continue adding 1/2-inch pieces down to the ends and secure with an elastic.

Via Seventeen Magazine